This guide outlines the step-by-step process of deploying a secure and efficient three-tier architecture on AWS, covering S3 bucket creation, IAM EC2 role setup, VPC and subnet configuration, internet connectivity with IGW and NAT Gateway, route table and security group setup, database deployment using Amazon RDS, app tier deployment with EC2 instances, internal load balancing, and web tier instance deployment with NGINX for serving the frontend application.
Setup
S3 Bucket Creation
Navigate to the S3 service in the AWS console and create a new S3 bucket.

IAM EC2 Instance Role Creation
1.Navigate to the IAM dashboard in the AWS console and create an EC2 role.
2.Select EC2 as the trusted entity.
3.When adding permissions, include the following AWS managed policies. You can search for them and select them. These policies will allow our instances to download our code from S3 and use Systems Manager Session Manager to securely connect to our instances without SSH keys through the AWS console.
AmazonSSMManagedInstanceCore
AmazonS3ReadOnlyAccess

Part 1: Networking and Security
VPC and Subnets
VPC Creation: Start by creating a Virtual Private Cloud (VPC) to isolatefrom other virtual networks in the AWS Cloud. Define the IP address range using CIDR notation, for example, 12.0.0.0/16.

Subnets: Divide your VPC into smaller subnets. Typically, you will create public and private subnets. Public subnets are for resources that need direct access to the internet, while private subnets are for internal resources.
Note: We will need six subnets across two availability zones. That means that three subnets will be in one availability zone, and three subnets will be in another zone. Each subnet in one availability zone will correspond to one layer of our three tier architecture. Create each of the 6 subnets by specifying the VPC we created in part 1 and then choose a name, availability zone, and appropriate CIDR range for each of the subnets.

Internet Connectivity
Internet Gateway: Attach an Internet Gateway (IGW) to your VPC to allow communication between your VPC and the internet. This is essential for resources in public subnets.

NAT Gateway: Any resources in private subnets that need to access the internet (e.g., for software updates), set up a NAT Gateway. This allows outbound internet traffic while keeping the resources inaccessible from the internet.

Why we need a NAT Gateway,so here we set a vpc with public and private subnets so, any resource present inside the private subnet will not able to download any new packages and also any new updates so solve this issue aws provide a nat gateway with the help to nat gateway Ec2 instance can communicate with internet it can downloads some packages and updates which needed for Ec2 instance but other way around where user trying to access a Nat gateway to access Ec2 instance present into private subnet is not possible.
So, Nat Gateway always a one-way route where an Ec2 instance and any resource present into private subnet and go out access the other resources.
Note: In order for our instances in the app layer private subnet to be able to access the internet they will need to go through a NAT Gateway. For high availability, you’ll deploy one NAT gateway in each of your public subnets.

Routing Configuration
Route Tables: Create and configure route tables to control the traffic routing within your VPC. Associate the public subnets with a route table that directs internet-bound traffic to the Internet Gateway.


Private Subnet Routing: Associate private subnets with a route table that directs internet-bound traffic to the NAT Gateway.


Security Groups
Security Group Creation: Create security groups to control inbound and outbound traffic to your instances. Security groups act as virtual firewalls.
Rules Configuration: Define rules for each security group. For example, allow HTTP and HTTPS traffic for web servers in public subnets, and restrict access to databases in private subnets to only the application servers.
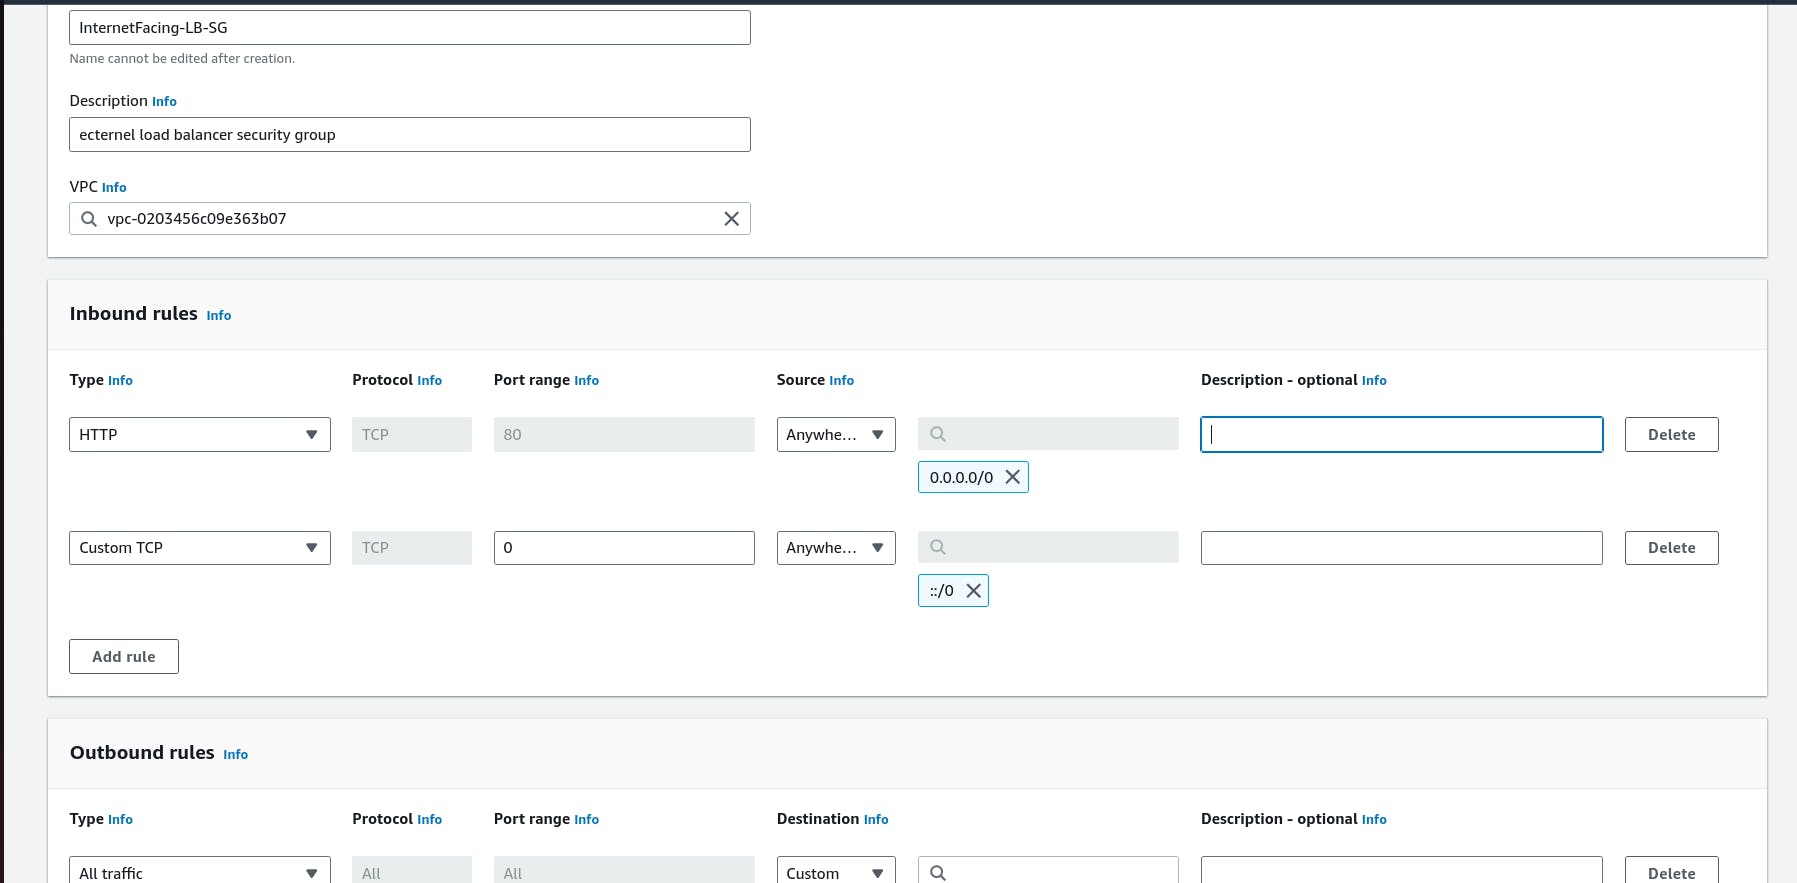
i.*The first security group you’ll create is for the public,internet facingload balancer. After typing a name and description, add an inbound rule to allowHTTPtype traffic for your*IP*.*
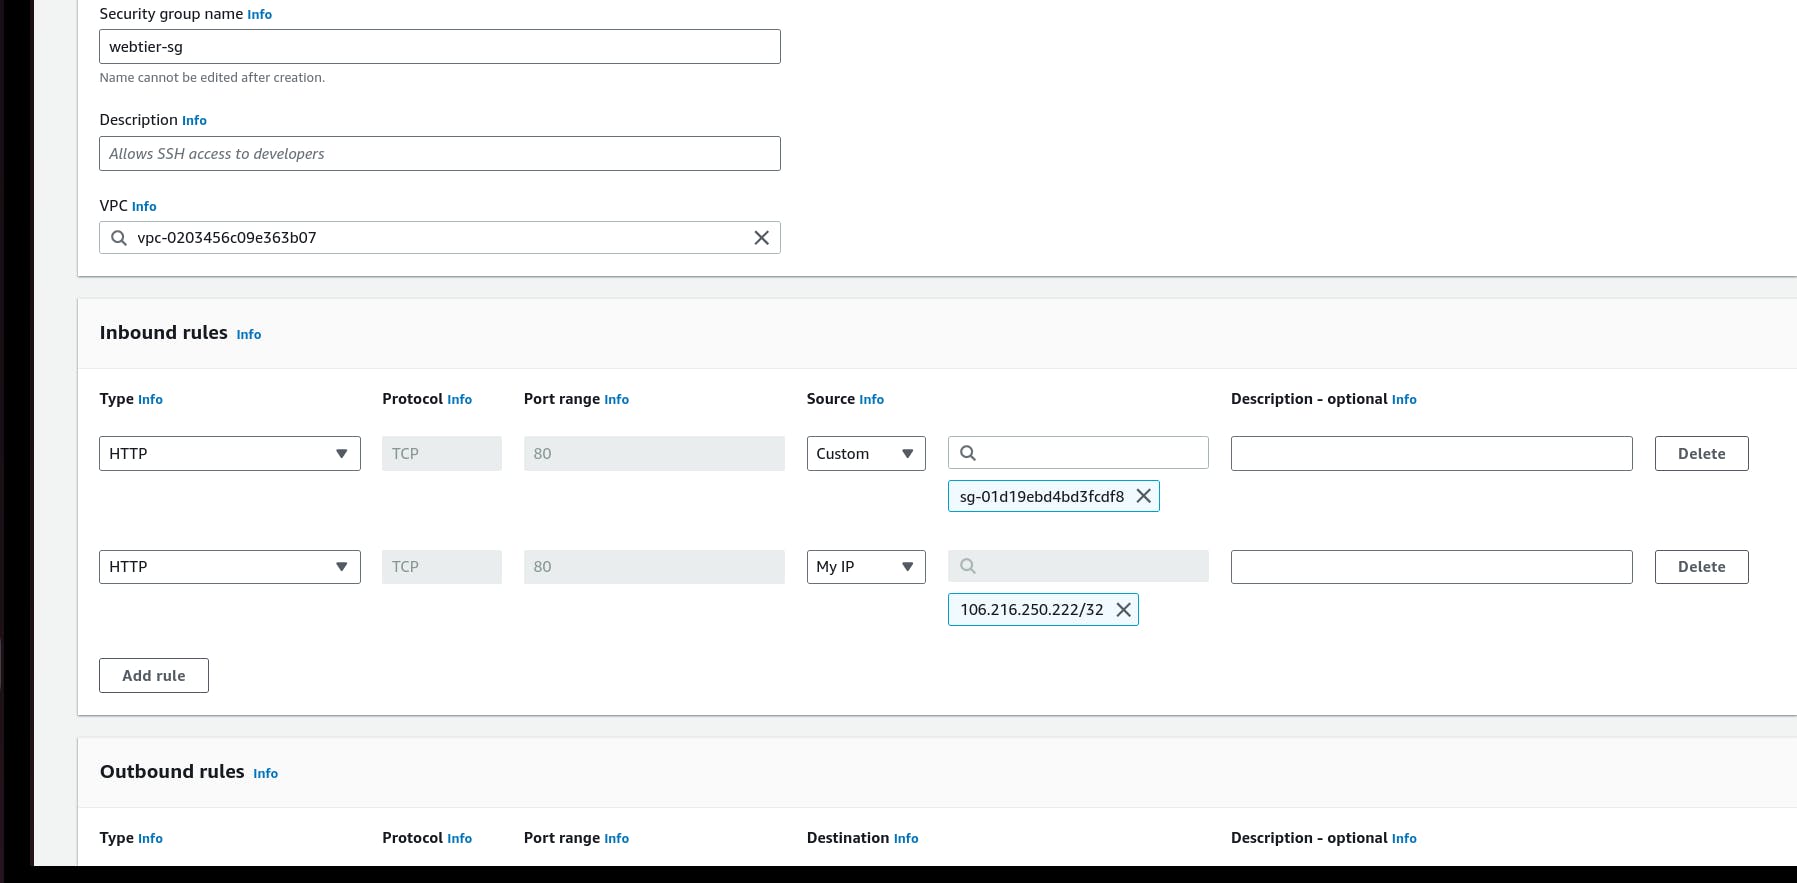
ii.*The second security group you’ll create is for the public instances in the web tier. After typing a name and description, add an inbound rule that allowsHTTPtype traffic from your internet facing load balancer security group you created in the previous step. This will allow traffic from your public facing load balancer to hit your instances. Then, add an additional rule that will allow HTTP type traffic for your IP. This will allow you to access your instance when we test.*
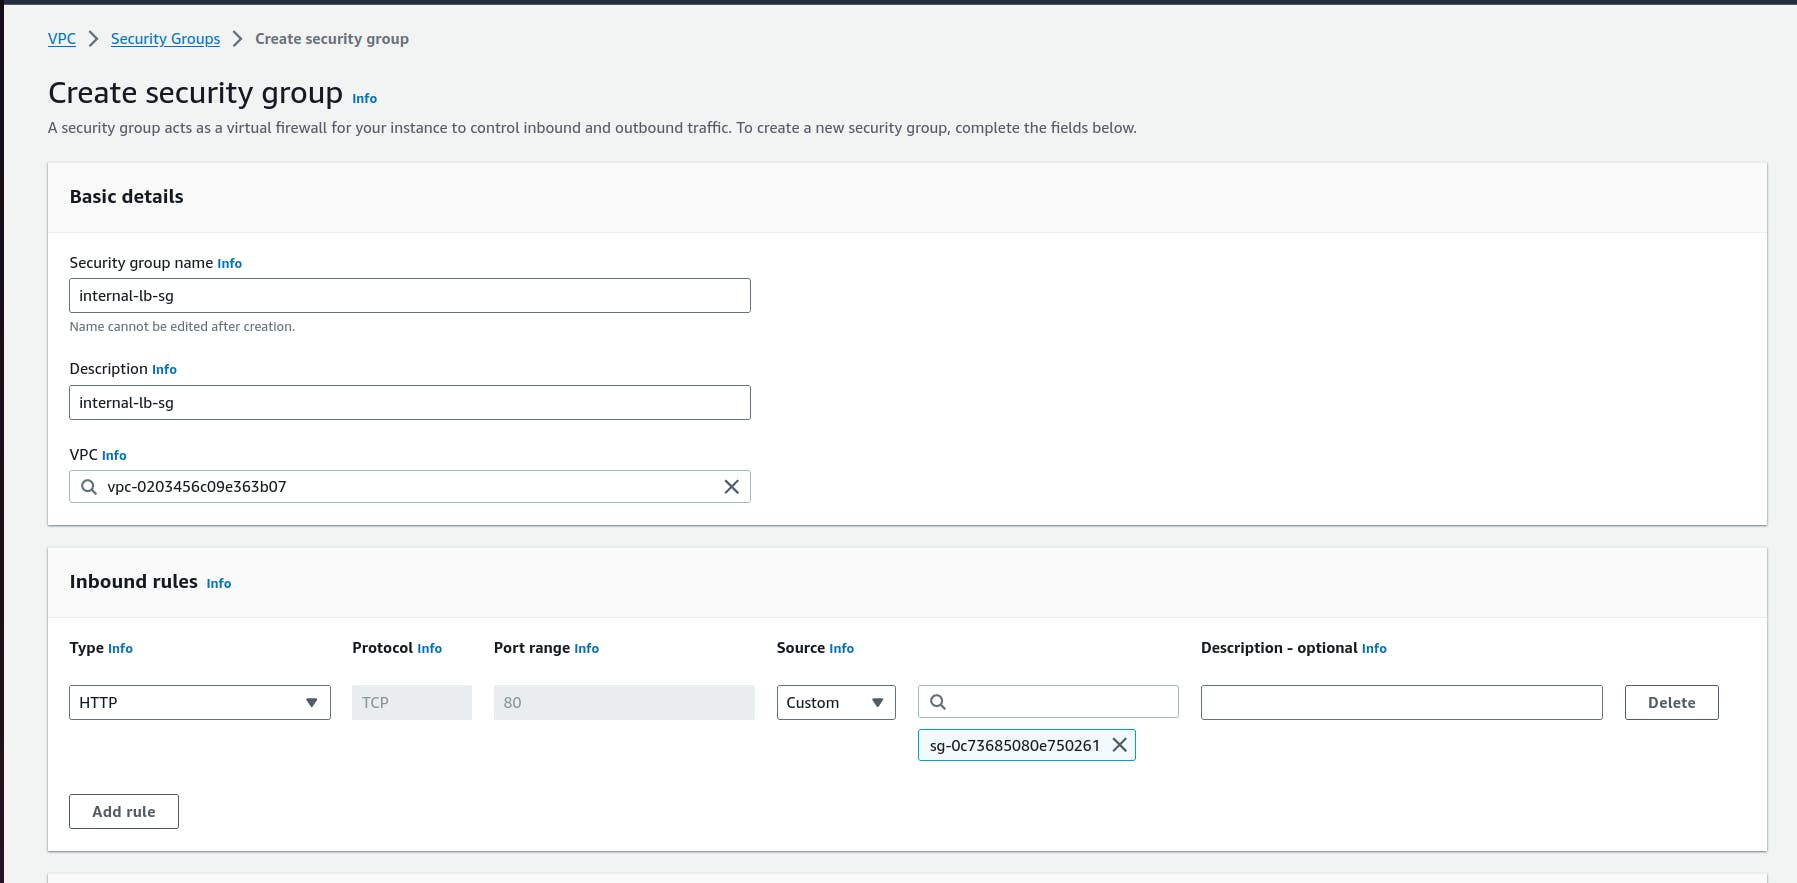
iii.*The third security group will be for our internal load balancer. Create this new security group and add an inbound rule that allowsHTTPtype traffic from your public instance security group. This will allow traffic from your web tier instances to hit your internal load balancer.*
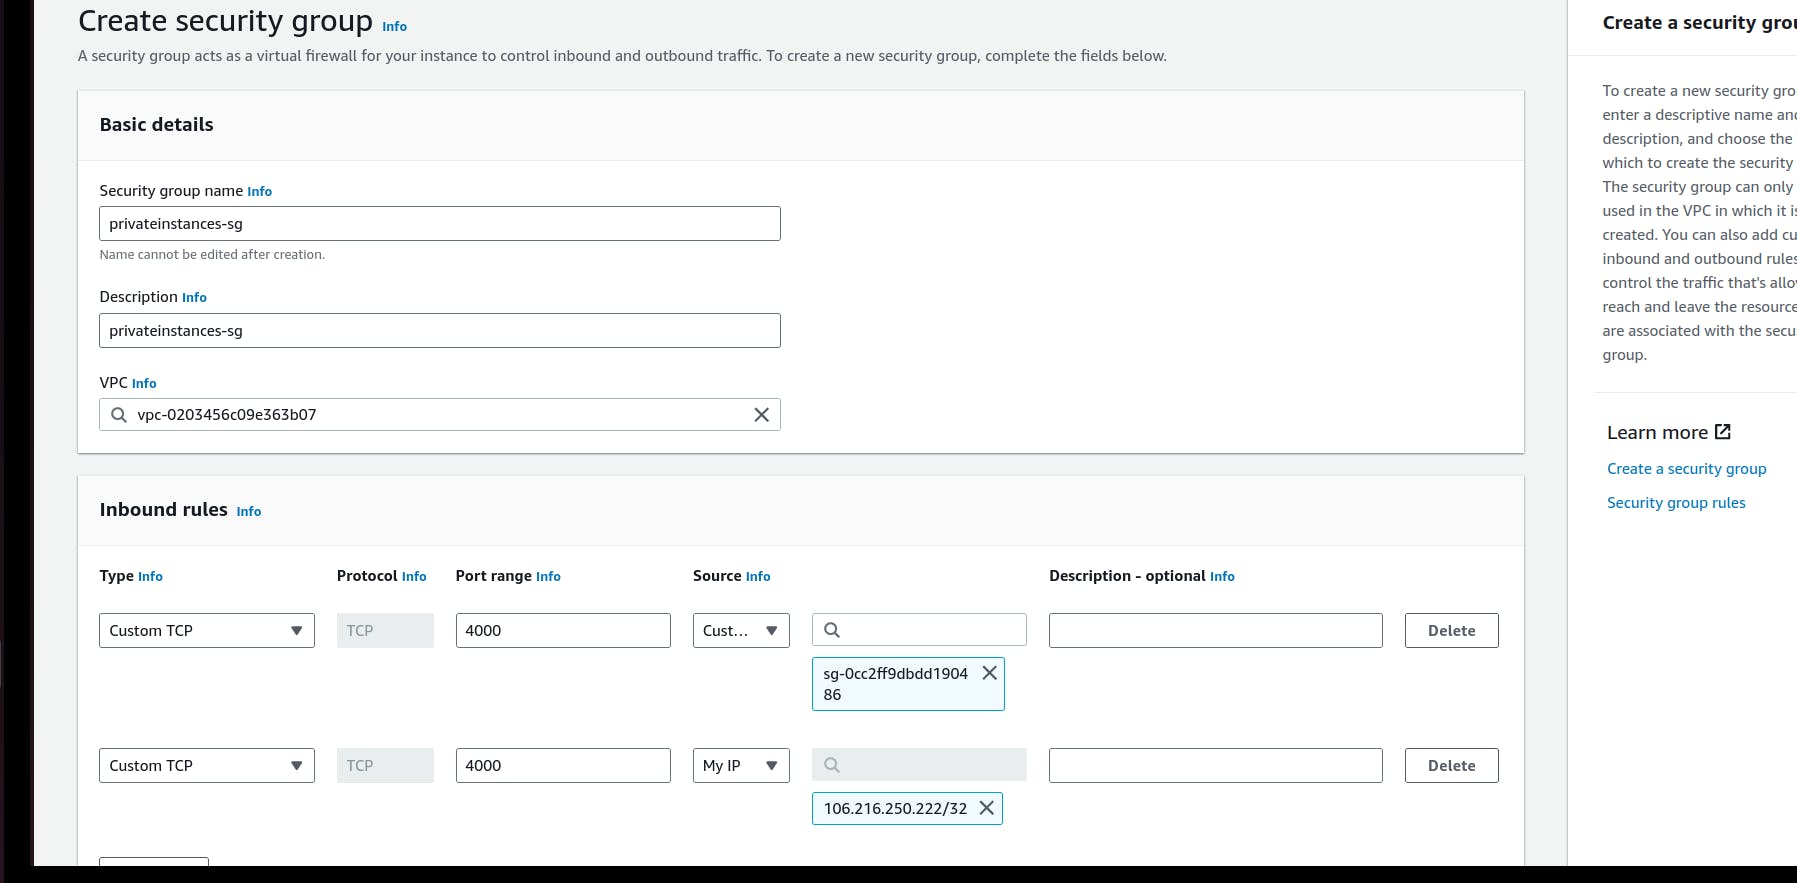
iv.*The fourth security group we’ll configure is for our private instances. After typing a name and description, add an inbound rule that will allowTCPtype traffic on port4000from theinternal load balancer security groupyou created in the previous step. This is the port our app tier application is running on and allows our internal load balancer to forward traffic on this port to our private instances. You should also add another route for port4000that allowsyour IPfor testing.*
v.*The fifth security group we’ll configure protects our private database instances. For this security group, add an inbound rule that will allow traffic from the private instance security group to the MYSQL/Aurora port (3306).*
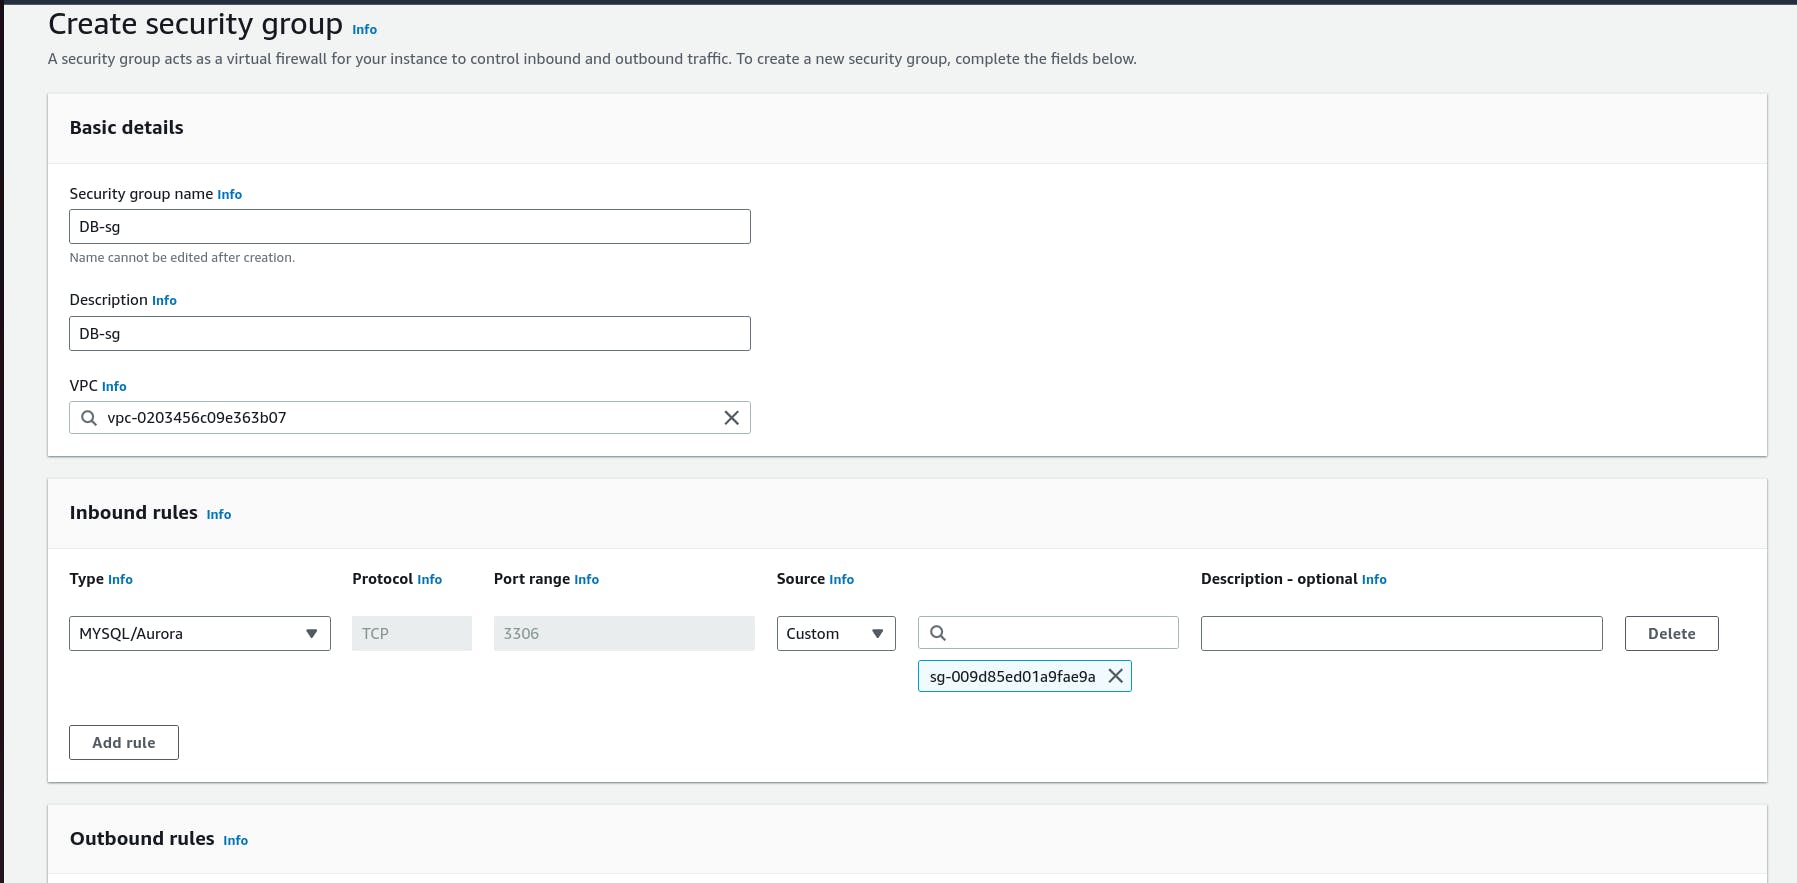
By following these steps, you can set up a secure and efficient networking environment for your three-tier architecture on AWS.
Part 2: Database Deployment
Subnet Groups
Subnet Group Creation: Create a subnet group for your database. A subnet group is a collection of subnets that you can designate for your database instances. This allows your database to span multiple Availability Zones, enhancing availability and fault tolerance.
Subnet Selection: Choose subnets from different Availability Zones within your VPC to ensure high availability. This setup helps in maintaining database operations even if one Availability Zone goes down.
Navigate to the RDS dashboard in the AWS console and click onSubnet groupson the left hand side. Click**Create DB subnet group*.*

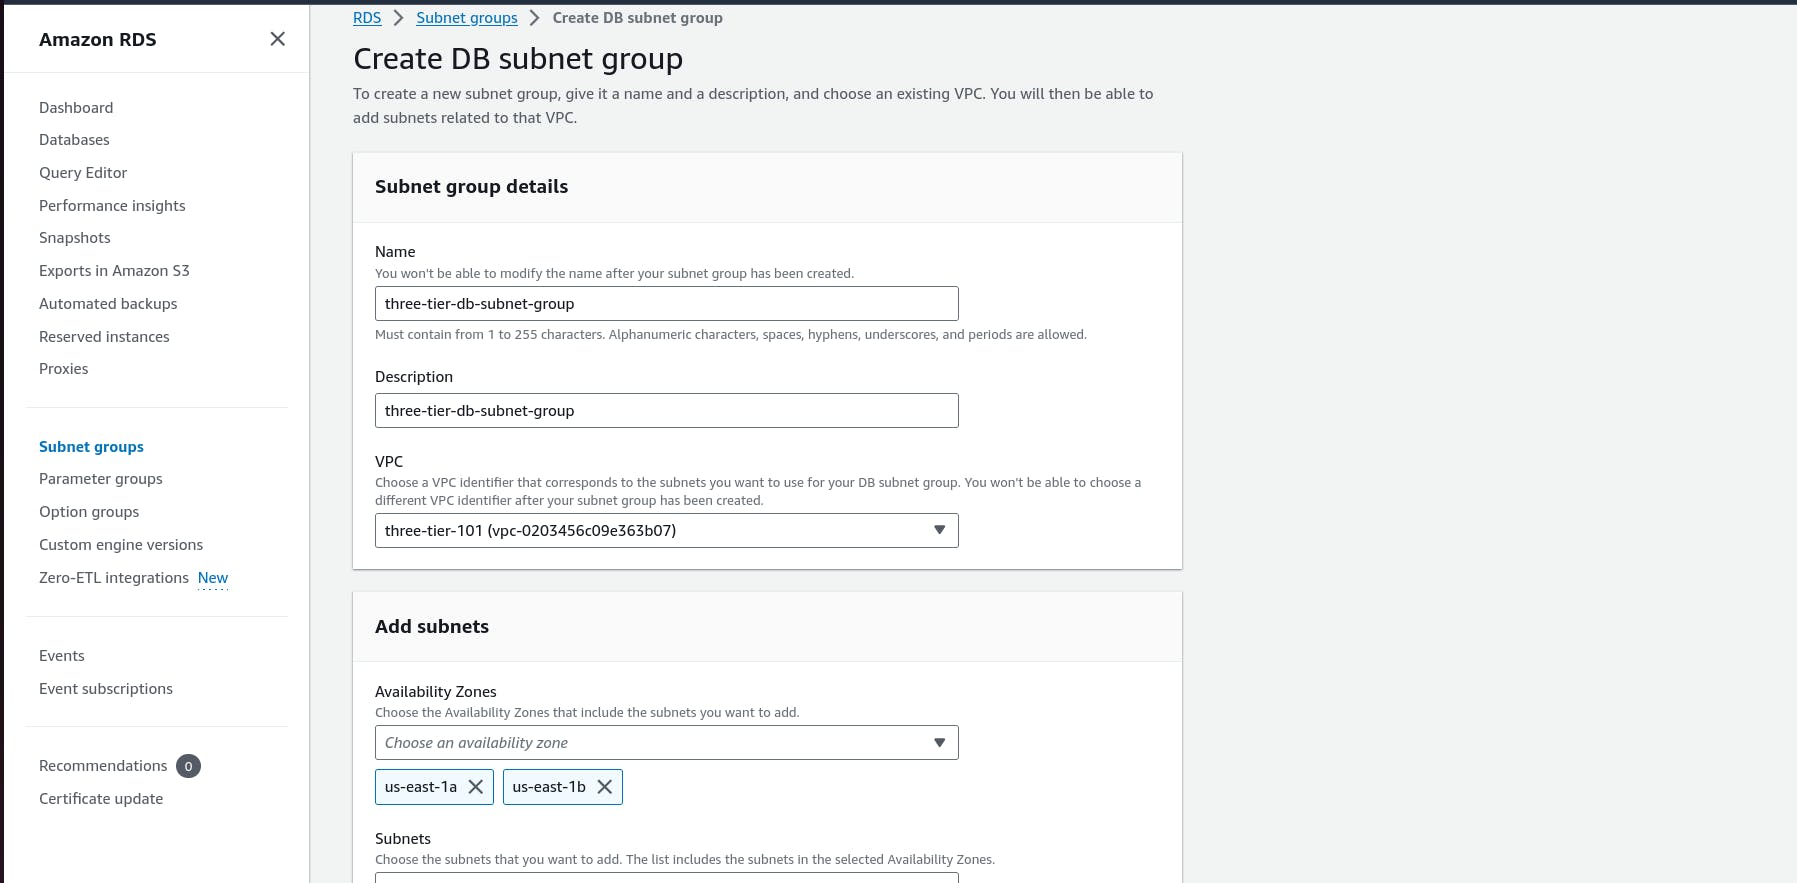
When adding subnets, make sure to add the subnets we created in each availability zone specificaly for our database layer. You may have to navigate back to the VPC dashboard and check to make sure you're selecting the correct subnet IDs.
Database Deployment
Check this link for creating-a-mysql-database-on-amazon-relational-database-service-rds
RDS Instance Creation: Use Amazon RDS (Relational Database Service) to create your database instance. Select the database engine (e.g., MySQL, PostgreSQL, etc.) and configure the instance specifications such as instance class, storage type, and allocated storage.
Parameter Groups: Configure parameter groups to manage database engine configurations. Parameter groups act as a container for engine configuration values that can be applied to one or more DB instances.
Security Groups: Assign security groups to your RDS instance to control inbound and outbound traffic. Ensure that the security group allows traffic from your application servers.
Backup and Maintenance: Configure automated backups and maintenance windows for your RDS instance. Automated backups help in point-in-time recovery, while maintenance windows allow for software patching and updates.
By following these steps, you can deploy a robust and highly available database setup as part of your three-tier architecture on AWS.
Part 3: App Tier Instance Deployment
App Instance Deployment
Launch EC2 Instances: Start by launching EC2 instances that will serve as your application servers. Choose an appropriate instance type based on your application's requirements.
Assign Security Groups: Assign security groups to your EC2 instances to control inbound and outbound traffic. Ensure that the security group allows traffic from the web servers and to the database servers.

Connect to Instance
SSH to private server from public server
Going to login my Public Ec2 instance using Private Key
download Private key in your Public Ec2 instance
sudo chmod 400 "Name of the private-key.pem"To Connect to private instance from public instance
Run command:
ssh username@<private IP>
Run command: ping 8.8.8.8
( As this instance is not connected to internet , it will not give result)

Configure Database
Start by downloading the MySQL CLI:
sudo apt-get install mysql-clientInitiate your DB connection with your Aurora RDS writer endpoint. In the following command, replace the RDS writer endpoint and the username, and then execute it in the browser terminal:
mysql -h CHANGE-TO-YOUR-RDS-ENDPOINT -u CHANGE-TO-USER-NAME -p
You will then be prompted to type in your password. Once you input the password and hit enter, you should now be connected to your database.
NOTE: If you cannot reach your database, check your credentials and security groups.
Create a database called webappdb with the following command using the MySQL CLI:
CREATE DATABASE webappdb;
You can verify that it was created correctly with the following command:
1
SHOW DATABASES;
- Create a data table by first navigating to the database we just created:
1
USE webappdb;
Then, create the following transactions table by executing this create table command:
CREATE TABLE IF NOT EXISTS transactions(id INT NOT NULL
AUTO_INCREMENT, amount DECIMAL(10,2), description
VARCHAR(100), PRIMARY KEY(id));
Verify the table was created:
SHOW TABLES;
- Insert data into table for use/testing later:
INSERT INTO transactions (amount,description) VALUES ('400','groceries');
Verify that your data was added by executing the following command:
SELECT * FROM transactions;

When finished, just type exit and hit enter to exit the MySQL client.
Configure App Instance
Note: The first thing we will do is update our database credentials for the app tier. To do this, open the application-code/app-tier/DbConfig.js file from the github repo in your favorite text editor on your computer. You’ll see empty strings for the hostname, user, password and database. Fill this in with the credentials you configured for your database, the writer endpoint of your database as the hostname, and webappdb for the database. Save the file.


To Connect to private instance from public instance
curl -o- https://raw.githubusercontent.com/nvm-sh/nvm/v0.38.0/install.sh | bash
source ~/.bashrc

Next, install a compatible version of Node.js and make sure it's being used
nvm install 16
nvm use 16
PM2 is a daemon process manager that will keep our node.js app running when we exit the instance or if it is rebooted. Install that as well.
npm install -g pm2
Now we need to download our code from our s3 buckets onto our instance. In the command below, replace BUCKET_NAME with the name of the bucket you uploaded the app-tier folder to:
cd ~/
aws s3 cp s3://BUCKET_NAME/app-tier/ app-tier --recursive

Need To install the AWS CLI packages to resolve this error, run the following commands.
$ curl "https://awscli.amazonaws.com/awscli-exe-linux-x86_64.zip" -o "awscliv2.zip"unzipawscliv2.zipsudo ./aws/install --bin-dir /usr/local/bin --install-dir /usr/local/aws-cli --update

Now we need to download our code from our s3 buckets onto our instance. In the command below, replace BUCKET_NAME with the name of the bucket you uploaded the app-tier folder to:
 cd ~/
 aws s3 cp s3://BUCKET_NAME/app-tier/ app-tier --recursive

Navigate to the app directory, install dependencies, and start the app with pm2.
cd ~/app-tier
npm install
pm2 start index.js

To make sure the app is running correctly run the following:
pm2 list

If you see a status of online, the app is running. If you see errored, then you need to do some troubleshooting. To look at the latest errors, use this command:
pm2 logs
NOTE: If you’re having issues, check your configuration file for any typos, and double check that you have followed all installation commands till now.
- Right now, pm2 is just making sure our app stays running when we leave the SSM session. However, if the server is interrupted for some reason, we still want the app to start and keep running. This is also important for the AMI we will create:
pm2 startup
After running this you will see a message similar to this.

DO NOT run the above command, rather you should copy and past the command in the output you see in your own terminal. After you run it, save the current list of node processes with the following command:
pm2 save

Test App Tier
Now let's run a couple tests to see if our app is configured correctly and can retrieve data from the database.
To hit out health check endpoint, copy this command into your SSM terminal. This is our simple health check endpoint that tells us if the app is simply running.
curl http://localhost:4000/health
The response should looks like the following:

Next, test your database connection. You can do that by hitting the following endpoint locally:
curl http://localhost:4000/transaction
You should see a response containing the test data we added earlier:

Internal Load Balancing
Create an AMI of our App Tier
Stop the Instance: Before creating an AMI, stop the EC2 instance to ensure data consistency.
Create Image: Navigate to the EC2 dashboard, select the instance, and click on "Actions" > "Image and templates" > "Create image".

Configure Image: Provide a name and description for the AMI. Ensure that the root volume and any additional volumes are included.
Create Image: Click on "Create image". The AMI creation process will start, and you can monitor its progress in the "AMIs" section of the EC2 dashboard.
Target Group
The purpose of forming this target group is to use with our load blancer so it may balance traffic across our private app tier instances. Select Instances as the target type and give it a name.

Then, set the protocol to HTTP and the port to 4000. Remember that this is the port our Node.ja app is running on. Select the VPC we've been using thus far, and then change the health check path to be /health. This is the health check endpoint of our app. Click Next.

Deploy Internal Load Balancer
We'll be using an Application Load Balancer for our HTTP traffic so click the create button for that option.

After giving the load balancer a name, be sure to select internal since this one will not be public facing, but rather it will route traffic from our web tier to the app tier.

Select the correct network configuration for VPC and private subnets.

Select the security group we created for this internal ALB. Now, this ALB will be listening for HTTP traffic on port 80. It will be forwarding the traffic to our target group that we just created, so select it from the dropdown, and create the load balancer

Web Tier Instance Deployment
Update Config File
Before we create and configure the web instances, open up the application-code/nginx.conf file from the repo we downloaded. Scroll down to line 58 and replace [INTERNAL-LOADBALANCER-DNS] with your internal load balancer’s DNS entry. You can find this by navigating to your internal load balancer's details page.

Then, upload this file and the application-code/web-tier folder to the s3 bucket you created for this lab.
Web Instance Deployment
We created a instance in one of our public subnets. Make sure to select the correct network components, security group, and IAM role. This time, auto-assign a public ip on the Configure Instance Details page.

Connect to Instance
Follow the same steps you used to connect to the app instance and change the user to ubuntu. Test connectivity here via ping as well since this instance should have internet connectivity:
sudo -su ec2-user
ping 8.8.8.8
Note: If you don't see a transfer of packets then you'll need to verify your route tables attached to the subnet that your instance is deployed in.
Configure Web Instance
- We now need to install all of the necessary components needed to run our front-end application. Again, start by installing NVM and node :
curl -o- https://raw.githubusercontent.com/nvm-sh/nvm/v0.38.0/install.sh | bash
source ~/.bashrc
nvm install 16
nvm use 16

Now we need to download our web tier code from our s3 bucket:
cd ~/
aws s3 cp s3://BUCKET_NAME/web-tier/ web-tier --recursive
Navigate to the web-layer folder and create the build folder for the react app so we can serve our code:
cd ~/web-tier
npm install
npm run build

NGINX can be used for different use cases like load balancing, content caching etc, but we will be using it as a web server that we will configure to serve our application on port 80, as well as help direct our API calls to the internal load balancer.
sudo apt update
sudo apt install nginx -y

- We will now have to configure NGINX. Navigate to the Nginx configuration file with the following commands and list the files in the directory:
cd /etc/nginx
ls

You should see an nginx.conf file. We’re going to delete this file and use the one we uploaded to s3. Replace the bucket name in the command below with the one you created for this workshop:
sudo rm nginx.conf
sudo aws s3 cp s3://BUCKET_NAME/nginx.conf .
Then, restart Nginx with the following command:
sudo systemctl status nginx
sudo systemctl restart nginx
sudo service nginx restart
We getting Error when we restart the nginx.
sudo fuser -k 80/tcp
another error, we get the failed to start high performance web server and reverse proxy server when running:
Note: restart nginx after making the server block configurations below to my /etc/nginx/sites-available/default file. My app is being served in /var/www/html:
sudo /etc/init.d/nginx restart

Now when you plug in the public IP of your web tier instance, you should see your website, which you can find on the Instance details page on the EC2 dashboard. If you have the database connected and working correctly, then you will also see the database working. You’ll be able to add data. Careful with the delete button, that will clear all the entries in your database.


